| 판매가 | 22,900원 |
|---|---|
| 적립금 | 114원 (0.50%) |
| 배송비 | 3,000원 (80,000원 이상 구매 시 무료) |
| 수량 |   |
| SNS 상품홍보 | |
|---|

| 구분 | |
|---|---|
 |
|
(최소주문수량 1개 이상 / 최대주문수량 0개 이하)
사이즈 가이드 수량을 선택해주세요.
위 옵션선택 박스를 선택하시면 아래에 상품이 추가됩니다.
| 상품명 | 상품수 | 가격 |
|---|---|---|
| [Furious] FrSky Micro Rx-Ultra Small Massively Capable |


|
22900 ( 114) 114)
|
| 총 상품금액(수량) : 0 (0개) | ||


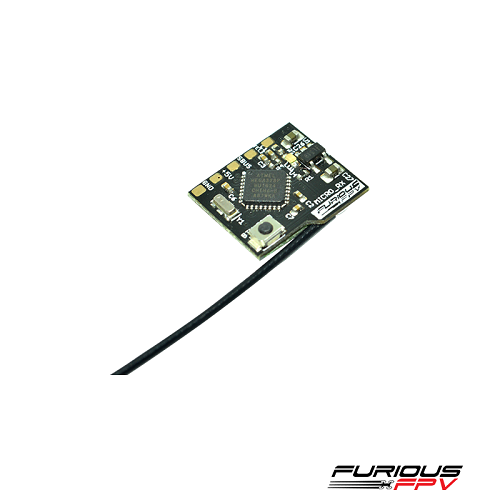
Furious FrSky Micro Rx - Ultra Small. Massively Capable. *** Only international firmware - NOT EU-LBT firmware yet.
Sizing in on a nano scale, the all new Furious FrSky Micro Rx is the ultimate solution when space is at an all time premium. And weight? Forget about it - this unit weighs in on the sub atomic scale, making the Furious Micro Rx the perfect fit for the most compact aircraft to date.
Designed specifically for ultra brushed micro FPV machines that require the most size and weight sensitive components, Furious FPV brings performance and capability to the table in a zero compromise solution. And when weight sensitivity is at play, the Furious Micro Rx steps in with a unworldly 1.0g weight, making the Furious FPV Micro Rx the lightest Rx ever produced in FPV.
Don't let the size fool you. When it comes to capability, the Furious Micro Rx packs a feature driven punch, providing an (8) channel output, telemetry hub, and an S-bus output without the need of inversion via PC. And did we mention a 300m range? That's over a quarter mile effective range - all in a 1.0g, 12x15x4mm layout.
For the ultimate in capability with a gnat sized layout, Furious FPV provides the perfect solution when space cannot be ignored.
Configuration
Following, there’s some useful info for the setup and use of your Furious Mini RX.
1. Binding the receiver to the Frsky Taranis
In the Taranis, go to MODE SETUP (page 2) in the model configuration.
Go to Mode inside Internal RF and select D8.
Press and hold the receiver bind button and plug your battery in to turn the receiver on.
Release the button. A green LED lights up in the receiver.
Going back to the Taranis; we press BIND. The transmitter beeps, indicating it’s in bind mode.
Wait for the green LED on the receiver to turn off. The binding procedure has finished.
Exit the BIND mode in the Taranis.
Unplug the battery to turn off the receiver.
2. Binding the receiver to the XJT module
Using the dip switches of the XJT module, select the D8 mode. They shoud be in the following position: switch 1 = ON, switch 2 = OFF.
Press and hold the receiver bind button and plug your battery in to turn the receiver on.
Release the button. A green LED lights up in the receiver.
Press and hold the bind button and turn the transmitter on.
Release the button. A green light shoud blink in the module, indicating it’s in bind mode.
Wait for the green LED on the receiver to turn off. The binding procedure has finished.
Turn the transmitter off.
Unplug the battery to turn off the receiver.
3. Receiver Configuration in the Cleanflight configurator
n the PORTS PORTS tab, select the UART that corresponds to the receiver (usually UART3 in F3 flight controllers) and activate Serial RX.
Save by clicking on the Save and Reboot button.
In the CONFIGURATION tab, in the Receiver Mode section, select RX_SERIAL.
In the same tab, in the Serial Receiver Provider section, select SBUS.
Save by clicking on the Save and Reboot button.
Go to CLI and type the following commands:
set sbus_inversion = OFF
save
The FC will reboot, applying the change.
Go to the RECEIVER tab and make sure the receiver acts like it should.
4. Telemetry Configuration:
In the PORTSPORTS tab, select the UART that corresponds to the telemetry (usually UART2 in F3 flight controllers) and select FrSky in Telemetry. Leave the baudrate to AUTO.
Go to CLI, and type the following commands:
set telemetry_inversion = OFF
save
The FC will reboot, applying the change.
Make sure you’re getting thetelemetry values in our Taranis correctly.
Features:
- Microscopic 12x15x4mm Footprint
- Sub Atomic Weight at 1.0 Overall
- Amazing 300m Range
- (8) Channel Output
- Integrated Telemetry Hub
- S-bus Ready Without FC Inversion
- Incredibly Compatible With FrSky Taranis, Taranis Plus & XJT Module
- Flexible 4V - 6V Input Ready
고객센터 02-6202-5555